0%

Spring Boot 入门指南:从零开始创建 Web 应用


本文面向 Java 初学者,详细介绍 Spring Boot 框架原理、应用场景及从零搭建 Web 应用的完整流程。

Spring Boot 框架简介

基本原理

Spring Boot 是 Spring 框架的扩展,通过 约定优于配置 的理念解决传统 Spring 应用配置复杂的问题,简化 Spring 应用的初始搭建和开发过程。通过自动配置和起步依赖(Starter Dependencies)来减少开发者的配置工作,Spring Boot 内嵌了 Tomcat、Jetty 或 Undertow 等服务器,因此无需部署 WAR 文件即可运行。核心思想是 让开发更简单

核心特性

  1. 自动配置:通过 @EnableAutoConfiguration 自动配置 Bean(基于项目中的 jar 依赖自动配置 Spring 应用)
  2. 起步依赖:通过提供预定义的依赖描述符(如 spring-boot-starter-web 包含了开发 Web 应用所需的依赖)简化构建配置,解决版本冲突。
  3. 内嵌服务:内置 Tomcat/Jetty/Undertow 等服务器,无需部署 WAR,直接运行一个独立的应用即可。
  4. Actuator:提供生产级监控和管理功能,如监控应用的健康状况、信息查看等。

工作原理

1
2
3
4
[启动类] → [@SpringBootApplication] 
→ 扫描 @Component → 加载 @Configuration
→ 读取 spring.factories → 应用自动配置
→ 启动内嵌容器

应用场景

Spring Boot 适用于构建微服务架构、RESTful API、企业级应用等。

环境准备

软件版本

  1. 开发工具:IntelliJ IDEA 2021+
  2. Java环境:JDK 1.8 或以上版本(建议使用 JDK 11 或 17)
  3. 构建工具:Maven 3.6+(IDEA 一般自带,但需确保配置正确)

配置 Maven 的 settings.xml

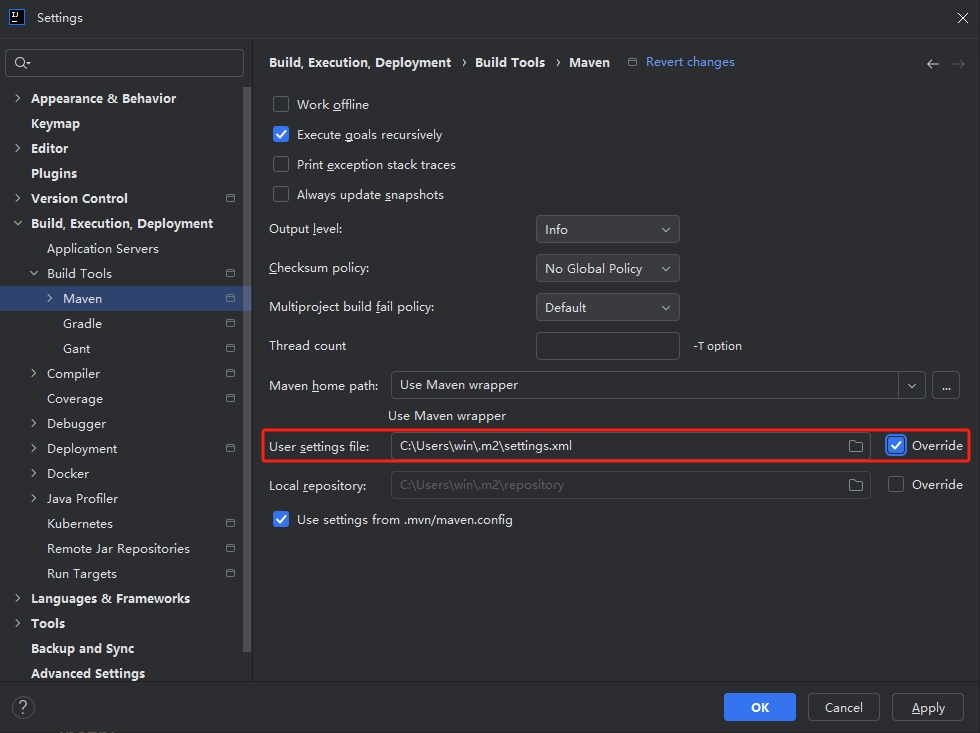
Maven的 settings.xml文件用于配置全局的 Maven 设置,如仓库镜像、代理等。通常位于Maven 安装目录的 conf 文件夹下,或者用户目录下的 .m2 文件夹(如 ~/.m2/settings.xml),在 IDEA → Settings 中可以直接查看文件路径:

配置样例如下:

settings.xml
1
2
3
4
5
6
7
8
9
10
11
12
13
14
15
16
<settings xmlns="http://maven.apache.org/SETTINGS/1.0.0"
xmlns:xsi="http://www.w3.org/2001/XMLSchema-instance"
xsi:schemaLocation="http://maven.apache.org/SETTINGS/1.0.0
http://maven.apache.org/xsd/settings-1.0.0.xsd">

<!-- 添加阿里云镜像加速 -->
<mirrors>
<mirror>
<id>aliyun</id> <!-- 镜像的唯一标识 -->
<name>Aliyun Public Repository</name>
<url>https://maven.aliyun.com/repository/public</url>
<mirrorOf>*</mirrorOf> <!-- 匹配哪些仓库,`*` 表示所有仓库都使用该镜像 -->
</mirror>
</mirrors>

</settings>

IDEA 配置

  1. 配置 Maven 路径:File → Settings → Build, Execution, Deployment → Build Tools → Maven
  2. 设置 JDK 版本:File → Project Structure → SDKs

创建 Spring Boot 项目

项目初始化

在 IDEA 中创建 Spring Boot 项目有两种常用方式:

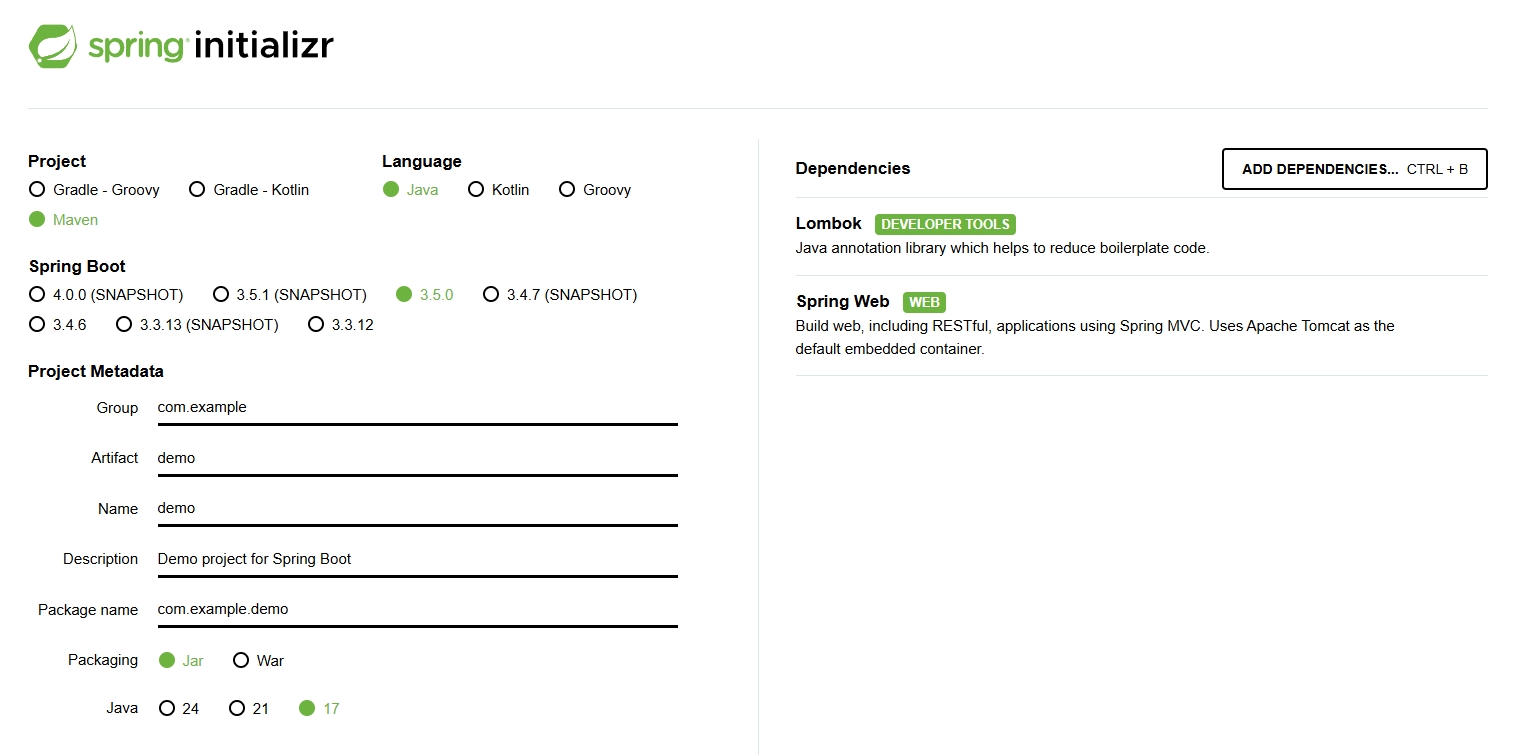
  1. 通过 Spring Initializr 网站(https://start.spring.io/)生成项目,然后导入 IDEA。
  2. 打开 IDEA → New → Project → Spring Boot,配置项目信息
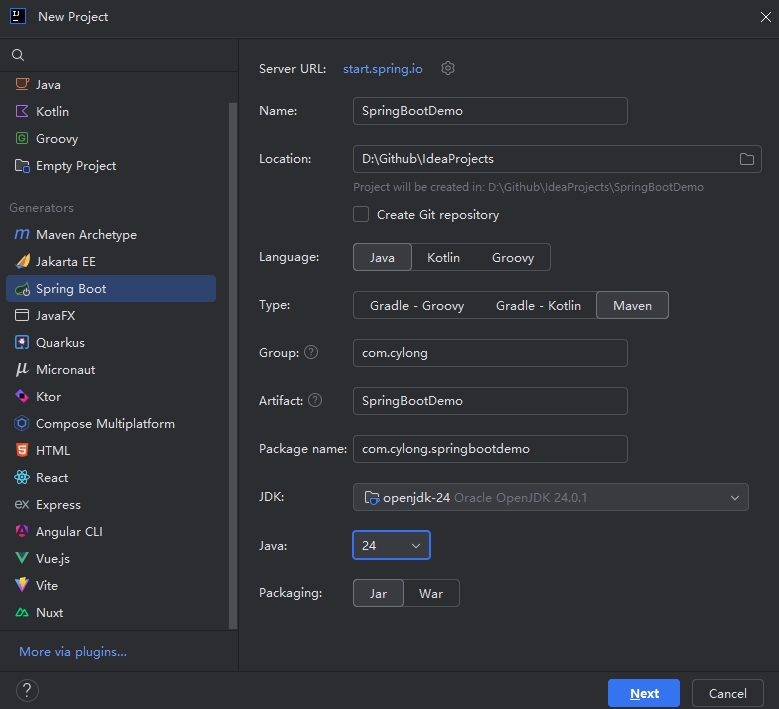
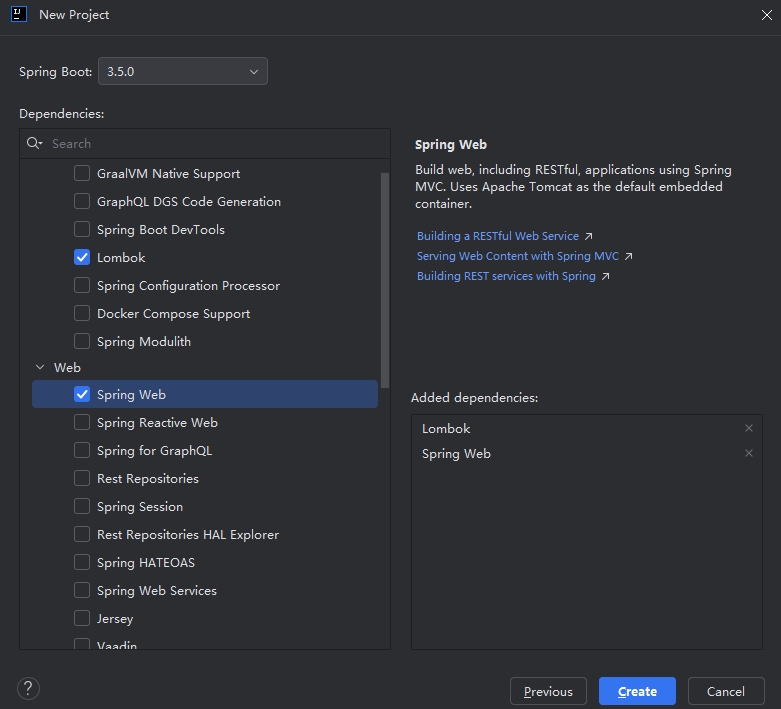
  3. 添加依赖
    • Spring Web:用于构建Web应用
    • Lombok:非必须,主要用于简化代码

项目结构解析

1
2
3
4
5
6
7
8
9
10
11
12
13
SpringBootDemo
├── src/main/java
│ └── com/cylong/springbootdemo
│ ├── SpringBootDemoApplication.java # 主启动类
│ └── controller
│ ├── HelloController.java # 控制器
│ └── Student.java # 这里主要用于展示 Lombok 简化代码作用
├── src/main/resources
│ ├── application.properties # 配置文件
│ ├── static # 静态资源(HTML, CSS, JS)
│ └── templates # 模板文件(Thymeleaf)
├── src/test # 测试代码
└── pom.xml # Maven 配置

核心配置文件详解

pom.xml 解析

pom.xml
1
2
3
4
5
6
7
8
9
10
11
12
13
14
15
16
17
18
19
20
21
22
23
24
25
26
27
28
29
30
31
32
33
34
35
36
37
38
39
40
41
42
43
44
45
46
47
48
49
50
51
52
53
54
55
56
57
58
59
60
61
62
63
64
65
66
67
68
69
70
71
72
73
74
75
76
77
78
<?xml version="1.0" encoding="UTF-8"?>
<project xmlns="http://maven.apache.org/POM/4.0.0" xmlns:xsi="http://www.w3.org/2001/XMLSchema-instance"
xsi:schemaLocation="http://maven.apache.org/POM/4.0.0 https://maven.apache.org/xsd/maven-4.0.0.xsd">
<modelVersion>4.0.0</modelVersion>

<!-- 继承 Spring Boot 默认配置,它提供了依赖管理,这样我们在添加其他 Spring Boot 依赖时就不需要指定版本号了 -->
<parent>
<groupId>org.springframework.boot</groupId>
<artifactId>spring-boot-starter-parent</artifactId>
<version>3.5.0</version>
<relativePath/> <!-- lookup parent from repository -->
</parent>

<!-- 通常填写公司或者个人域名的倒序,例如:com.example -->
<groupId>com.cylong</groupId>
<!-- 项目名称 -->
<artifactId>SpringBootDemo</artifactId>
<version>0.0.1-SNAPSHOT</version>
<name>SpringBootDemo</name>
<description>SpringBootDemo</description>

<properties>
<java.version>24</java.version>
</properties>
<dependencies>

<!-- Web 开发核心依赖,(如 Spring MVC,内嵌 Tomcat 等) -->
<dependency>
<groupId>org.springframework.boot</groupId>
<artifactId>spring-boot-starter-web</artifactId>
</dependency>

<!-- 测试依赖 -->
<dependency>
<groupId>org.springframework.boot</groupId>
<artifactId>spring-boot-starter-test</artifactId>
<scope>test</scope>
</dependency>

<!-- Lombok 依赖-->
<dependency>
<groupId>org.projectlombok</groupId>
<artifactId>lombok</artifactId>
<optional>true</optional>
</dependency>
</dependencies>

<!-- 打包插件(生成可执行 Jar) -->
<build>
<plugins>
<plugin>
<groupId>org.apache.maven.plugins</groupId>
<artifactId>maven-compiler-plugin</artifactId>
<configuration>
<annotationProcessorPaths>
<path>
<groupId>org.projectlombok</groupId>
<artifactId>lombok</artifactId>
</path>
</annotationProcessorPaths>
</configuration>
</plugin>
<plugin>
<groupId>org.springframework.boot</groupId>
<artifactId>spring-boot-maven-plugin</artifactId>
<configuration>
<excludes>
<exclude>
<groupId>org.projectlombok</groupId>
<artifactId>lombok</artifactId>
</exclude>
</excludes>
</configuration>
</plugin>
</plugins>
</build>

</project>

application.properties 解析

application.properties
1
2
3
4
5
6
7
8
9
# 应用名称
spring.application.name=SpringBootDemo
# 修改端口 默认8080
server.port=9090
# 配置上下文,URL变为:http://localhost:9090/demo/hello
# 如果不配置,默认是:http://localhost:9090/hello
server.servlet.context-path=/demo
# 自定义属性
welcome.message=Hello Spring Boot

编写第一个 Web 接口

创建控制器

HelloController.java
1
2
3
4
5
6
7
8
9
10
11
12
13
14
15
16
17
18
19
20
21
22
23
package com.cylong.springbootdemo.controller;

import org.springframework.beans.factory.annotation.Value;
import org.springframework.web.bind.annotation.GetMapping;
import org.springframework.web.bind.annotation.RestController;

// 表明这是一个控制器,并且返回的数据直接写入响应体(如 JSON 或字符串)
@RestController // = @Controller + @ResponseBody
public class HelloController {

// application.properties 中自定义属性
@Value("${welcome.message}")
private String welcomeMsg;

// 映射 GET 请求到 /hello 路径
@GetMapping("/hello")
public String sayHello() {
Student student = new Student();
student.setNo("1000");
student.setName("张三");
return welcomeMsg + " " + student.getName() + " 访问成功!";
}
}
Student.java
1
2
3
4
5
6
7
8
9
10
11
12
13
14
15
16
package com.cylong.springbootdemo.controller;

import lombok.Data;

@Data
public class Student {

/**
* 学号
*/
private String no;
/**
* 姓名
*/
private String name;
}

这里 @Data 是 Lombok 提供的一个组合注解,它主要用于简化 Java Bean 的编写。当你在类上使用 @Data 注解时,Lombok 会在编译时自动为类生成以下方法:

  1. 所有字段的 getter 方法(对于非 static 字段)
  2. 所有非 final 字段的 setter 方法
  3. equals() 方法
  4. hashCode() 方法
  5. toString() 方法

创建启动类

SpringBootDemoApplication.java
1
2
3
4
5
6
7
8
9
10
11
12
13
14
15
16
package com.cylong.springbootdemo;

import org.springframework.boot.SpringApplication;
import org.springframework.boot.autoconfigure.SpringBootApplication;

// 核心注解:启用自动配置和组件扫描
// 组合了 @Configuration + @EnableAutoConfiguration + @ComponentScan
@SpringBootApplication
public class SpringBootDemoApplication {

public static void main(String[] args) {
// 启动 Spring 应用
SpringApplication.run(SpringBootDemoApplication.class, args);
}

}

运行与测试

启动应用

  1. 右键 SpringBootDemoApplication → Run 'SpringBootDemoApplication' 或者使用 IDEA 工具栏的运行按钮。
  2. 查看控制台输出:
    1
    2
    3
    4
    5
    6
    7
    8
    9
    10
    11
    12
    13
    14
    15
    16
    17
    18
      .   ____          _            __ _ _
    /\\ / ___'_ __ _ _(_)_ __ __ _ \ \ \ \
    ( ( )\___ | '_ | '_| | '_ \/ _` | \ \ \ \
    \\/ ___)| |_)| | | | | || (_| | ) ) ) )
    ' |____| .__|_| |_|_| |_\__, | / / / /
    =========|_|==============|___/=/_/_/_/

    :: Spring Boot :: (v3.5.0)

    2025-06-15T06:53:46.411+08:00 INFO 22460 --- [SpringBootDemo] [ main] c.c.s.SpringBootDemoApplication : Starting SpringBootDemoApplication using Java 24.0.1 with PID 22460 (D:\Github\IdeaProjects\SpringBootDemo\target\classes started by win in D:\Github\IdeaProjects\SpringBootDemo)
    2025-06-15T06:53:46.413+08:00 INFO 22460 --- [SpringBootDemo] [ main] c.c.s.SpringBootDemoApplication : No active profile set, falling back to 1 default profile: "default"
    2025-06-15T06:53:46.865+08:00 INFO 22460 --- [SpringBootDemo] [ main] o.s.b.w.embedded.tomcat.TomcatWebServer : Tomcat initialized with port 9090 (http)
    2025-06-15T06:53:46.875+08:00 INFO 22460 --- [SpringBootDemo] [ main] o.apache.catalina.core.StandardService : Starting service [Tomcat]
    2025-06-15T06:53:46.875+08:00 INFO 22460 --- [SpringBootDemo] [ main] o.apache.catalina.core.StandardEngine : Starting Servlet engine: [Apache Tomcat/10.1.41]
    2025-06-15T06:53:46.904+08:00 INFO 22460 --- [SpringBootDemo] [ main] o.a.c.c.C.[Tomcat].[localhost].[/demo] : Initializing Spring embedded WebApplicationContext
    2025-06-15T06:53:46.904+08:00 INFO 22460 --- [SpringBootDemo] [ main] w.s.c.ServletWebServerApplicationContext : Root WebApplicationContext: initialization completed in 462 ms
    2025-06-15T06:53:47.124+08:00 INFO 22460 --- [SpringBootDemo] [ main] o.s.b.w.embedded.tomcat.TomcatWebServer : Tomcat started on port 9090 (http) with context path '/demo'
    2025-06-15T06:53:47.129+08:00 INFO 22460 --- [SpringBootDemo] [ main] c.c.s.SpringBootDemoApplication : Started SpringBootDemoApplication in 1.0 seconds (process running for 1.349)

浏览器访问

应用启动后,默认端口是 8080。我上文配置文件修改了端口号为 9090,并且设置了 context-path=/demo,所以打开浏览器访问:http://localhost:9090/demo/hello (默认是:http://localhost:8080/hello

页面输出:

1
Hello Spring Boot 张三 访问成功!

项目打包部署

  1. bash 执行以下命令:

    1
    2
    3
    4
    5
    # 生成可执行 JAR
    mvn clean package # 生成 target/SpringBootDemo-0.0.1-SNAPSHOT.jar

    # 运行应用
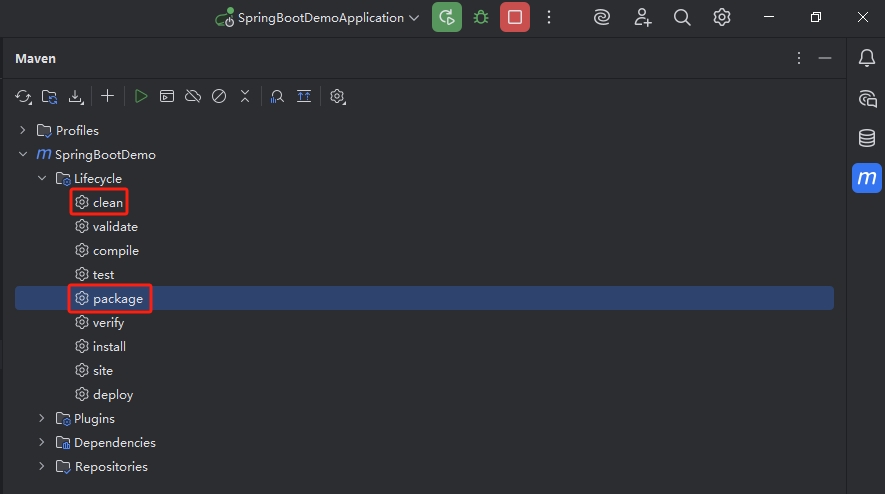
    java -jar target/SpringBootDemo-0.0.1-SNAPSHOT.jar
  2. 或者直接图形化界面打包:

常见问题排查

  1. 端口冲突:修改 server.port=9090,默认是 8080
  2. 404 错误:
    • 检查 @RestController 注解
    • 确认 URL 包含 context-path
  3. 依赖下载失败:
    • 检查 Maven 镜像配置
    • 执行 mvn clean install -U

分享精彩,留下足迹

欢迎关注我的其它发布渠道